Generate PDF with PDFMake in Node.js: Full Guide

Many server-side applications need to generate PDFs – invoices, reports, statements, certificates. PDFMake is one of the most popular Node.js PDF generation libraries: it works without native dependencies, uses a declarative JSON syntax for document definitions, and runs in both browser and server environments.
This guide covers PDFMake setup in Node.js, document structure, tables, images, watermarks, Express.js integration, and a full invoice example.
Why PDFMake for Node.js?
PDFMake was originally designed to work in both browser and Node.js environments, which makes it a good fit for server-side PDF generation.
Key characteristics:
- Pure JavaScript implementation: No native dependencies or compilation required.
- Consistent API: Same declarative approach in both client and server environments.
- Layout and styling support: Tables, columns, custom fonts, images, and watermarks.
- Active maintenance: Regular updates and strong community support.
- Performance: Efficiently handles large documents with optimized rendering.
- Integration-friendly: Works with Express, Fastify, Nest.js, and other frameworks.
For a comparison of all major Node.js PDF libraries, see Top Node.js PDF Generation Libraries Compared.
Setting Up PDFMake in Node.js
Let's start by setting up PDFMake in your Node.js application:
Installation
Install PDFMake using npm:
npm install pdfmake
Basic Setup
In a Node.js environment, you'll need to initialize PDFMake with fonts. Here's how to set up the basic structure:
// Import required modules
const PdfPrinter = require('pdfmake');
const fs = require('fs');
const path = require('path');

// Define font files
const fonts = {
  Roboto: {
    normal: path.join(__dirname, 'fonts/Roboto-Regular.ttf'),
    bold: path.join(__dirname, 'fonts/Roboto-Medium.ttf'),
    italics: path.join(__dirname, 'fonts/Roboto-Italic.ttf'),
    bolditalics: path.join(__dirname, 'fonts/Roboto-MediumItalic.ttf')
  }
};

// Create the printer
const printer = new PdfPrinter(fonts);
PDFMake requires at least one font to be defined. If you don't specify any fonts, you'll encounter an error when generating PDFs.
Managing Font Files
To use custom fonts in your PDFs, you need to have the font files accessible to your Node.js application. Here's a systematic approach:
- Create a
fontsdirectory in your project. - Download the required font files (e.g., Roboto from Google Fonts).
- Place them in the fonts directory.
- Reference them with absolute paths as shown above.
- Bundle the fonts with your application deployment.
- Use a CDN to serve font files for distributed applications.
- Consider using environment-specific paths with configuration management.
Creating Your First PDF with PDFMake
Now that we have PDFMake set up, let's create a simple PDF document:
// Define the document content
const docDefinition = {
  content: [
    'Hello!',
    'This is a simple PDF generated using PDFMake in Node.js',
    {
      text: 'This text is styled',
      style: 'header'
    },
    {
      text: [
        'You can also ',
        { text: 'combine ', bold: true },
        { text: 'different ', italics: true },
        { text: 'styles ', bold: true, italics: true },
        'in one text block'
      ]
    }
  ],
  styles: {
    header: {
      fontSize: 28,
      bold: true,
      margin: [0, 20, 0, 10]
    }
  }
};

// Generate the PDF
const pdfDoc = printer.createPdfKitDocument(docDefinition);

// Write to a file
pdfDoc.pipe(fs.createWriteStream('output.pdf'));
pdfDoc.end();
This basic example:
- Defines a document with text content and styles.
- Creates a PDFKit document using our printer.
- Pipes the output to a file stream.
- Ends the document to finalize the generation process.
Always call pdfDoc.end() after setting up your document. Without this, the document generation process won't complete and the file will remain incomplete.
Generating PDFs with PDFMake and Express.js
In a typical Node.js web application, you'll often want to generate PDFs on-demand and serve them to users.
Here's how to integrate PDFMake with Express.js:
const express = require('express');
const PdfPrinter = require('pdfmake');
const fs = require('fs');
const path = require('path');

const app = express();
const port = 3000;

// Define font files
const fonts = {
  Roboto: {
    normal: path.join(__dirname, 'fonts/Roboto-Regular.ttf'),
    bold: path.join(__dirname, 'fonts/Roboto-Medium.ttf'),
    italics: path.join(__dirname, 'fonts/Roboto-Italic.ttf'),
    bolditalics: path.join(__dirname, 'fonts/Roboto-MediumItalic.ttf')
  }
};

// Create printer instance
const printer = new PdfPrinter(fonts);

// Endpoint to generate and serve a PDF
app.get('/generate-pdf', (req, res) => {
  // Define the document
  const docDefinition = {
    content: [
      { text: 'Dynamic PDF Document', style: 'header' },
      { text: `Generated on: ${new Date().toLocaleString()}`, style: 'subheader' },
      { text: 'This PDF was generated on-demand by an Express.js server using PDFMake.' }
    ],
    styles: {
      header: {
        fontSize: 22,
        bold: true,
        margin: [0, 0, 0, 10]
      },
      subheader: {
        fontSize: 16,
        italic: true,
        margin: [0, 10, 0, 20]
      }
    }
  };

  // Create the PDF document
  const pdfDoc = printer.createPdfKitDocument(docDefinition);

  // Set response headers
  res.setHeader('Content-Type', 'application/pdf');
  res.setHeader('Content-Disposition', 'attachment; filename=document.pdf');

  // Pipe the PDF document to the response
  pdfDoc.pipe(res);
  pdfDoc.end();
});

app.listen(port, () => {
  console.log(`Server running at http://localhost:${port}`);
});
This Express.js example:
- Sets up a route to handle PDF generation requests.
- Creates a document definition with dynamic content.
- Sets appropriate response headers for PDF delivery.
- Streams the generated PDF directly to the client.
When generating PDFs based on user input, always validate and sanitize this input to prevent security vulnerabilities or unexpected behavior.
If your PDFs start as HTML rather than JSON definitions, consider generating PDFs with Puppeteer or using the PDFBolt HTML to PDF API instead.
PDFMake Document Structure
PDFMake uses a declarative approach for defining documents. Let's explore the key components and how to use them effectively in Node.js:
Document Definition
The document definition object is the main configuration for your PDF:
const docDefinition = {
  // Document metadata
  info: {
    title: 'Sample Document',
    author: 'Node.js Server',
    subject: 'PDFMake Sample',
    keywords: 'pdf, node.js, pdfmake',
  },

  // Content elements
  content: [],

  // Styling configuration
  styles: {},
  defaultStyle: {},

  // Page settings
  pageSize: 'A4',  // 'A4', 'LETTER', or {width: number, height: number}
  pageOrientation: 'portrait',  // 'portrait' or 'landscape'
  pageMargins: [40, 60, 40, 60], // [left, top, right, bottom]

  // Headers and footers
  header: {},
  footer: {},

  // Background definition
  background: {}
};
Content Elements
PDFMake supports various content elements that can be nested and combined to create complex layouts:
Text
// Simple text
{ text: 'Plain text' }

// Styled text
{
  text: 'Styled text',
  bold: true,
  fontSize: 16,
  color: 'blue',
  alignment: 'center', // 'left', 'center', 'right', 'justify'
  margin: [5, 2, 10, 20], // [left, top, right, bottom]
  lineHeight: 1.5
}

// Text with custom styling
{
  text: 'Text with custom style',
  style: 'myCustomStyle'
}

// Combination of styles in one text block
{
  text: [
    'Regular text, ',
    { text: 'bold text, ', bold: true },
    { text: 'regular again' }
  ]
}
Columns
Columns are powerful for creating complex layouts with multiple content blocks side by side:
{
  columns: [
    {
      // Column 1 - auto width
      width: 'auto',
      text: 'First column with automatic width'
    },
    {
      // Column 2 - star notation for remaining space
      width: '*', // Star notation means "fill the remaining space"
      text: 'Second column taking the remaining width'
    },
    {
      // Column 3 - percentage based width
      width: '20%',
      text: 'Third column with 20% width'
    },
    {
      // Column 4 - fixed width
      width: 100, // Fixed width of 100 units
      text: 'Fourth column with fixed width'
    }
  ],
  // Optional: Gap between columns in points
  columnGap: 10
}
You can nest any content inside columns, including other columns, tables, or images:
{
  columns: [
    {
      width: '50%',
      text: 'First column'
    },
    {
      width: '50%',
      // Nested column with a table
      table: {
        body: [
          ['Nested', 'Table'],
          ['Inside', 'Column']
        ]
      }
    }
  ]
}
Tables
Tables are essential for displaying structured data:
{
  table: {
    // Header row definition
    headerRows: 1,

    // Column widths - can be fixed, auto, star notation, or percentage
    widths: ['*', 'auto', 100, '20%'],

    // Table body
    body: [
      // Header row
      [
        { text: 'Header 1', style: 'tableHeader' },
        { text: 'Header 2', style: 'tableHeader' },
        { text: 'Header 3', style: 'tableHeader' },
        { text: 'Header 4', style: 'tableHeader' }
      ],
      // Data rows
      ['Value 1', 'Value 2', 'Value 3', 'Value 4'],
      ['Value 5', 'Value 6', 'Value 7', 'Value 8']
    ]
  },
  // Custom layout for the table
  layout: {
    hLineWidth: function(i, node) {
      // Different line widths based on position
      return (i === 0 || i === node.table.body.length) ? 2 : 1;
    },
    vLineWidth: function(i) {
      return 1;
    },
    hLineColor: function(i) {
      // Different line colors based on position
      return i === 0 ? '#000' : '#aaa';
    },
    fillColor: function(rowIndex) {
      // Zebra striping
      return (rowIndex % 2 === 0) ? '#f8f8f8' : null;
    },
    // Padding settings
    paddingLeft: function(i) { return 8; },
    paddingRight: function(i) { return 8; },
    paddingTop: function(i) { return 6; },
    paddingBottom: function(i) { return 6; }
  }
}
For convenience, PDFMake also provides predefined layouts:
// Using predefined layouts
{
  table: {
    // Table definition as above
  },
  // Use a predefined layout
  layout: 'lightHorizontalLines' // Other options: 'noBorders', 'headerLineOnly', 'lightHorizontalLines'
}
Lists
PDFMake supports both ordered and unordered lists:
// Unordered list
{
  ul: [
    'Simple item',
    {
      text: 'Item with custom styling',
      bold: true
    },
    {
      // Nested list
      ul: [
        'Nested item 1',
        'Nested item 2'
      ]
    }
  ],
  // Optional list styling
  style: 'listStyle'
}

// Ordered list
{
  ol: [
    'First item',
    'Second item',
    {
      // Nested ordered list
      ol: [
        'Nested ordered item 1',
        'Nested ordered item 2'
      ]
    }
  ],
  // Custom start number for ordered list
  start: 5,
  // Use different marker pattern (for ordered list)
  markerPattern: '(%s)',
  // Counter reset
  separator: ['(', ')'],
  // Counter type (decimal, lowerRoman, upperRoman, lowerAlpha, upperAlpha)
  type: 'lowerRoman'
}
Images
In Node.js, you have several options for including images:
// Using file paths
{
  image: path.join(__dirname, 'images/logo.png'),
  width: 200,
  height: 100, // optional, automatically calculated from width if maintaining aspect ratio
  alignment: 'center', // 'left', 'center', 'right'
  margin: [0, 10, 0, 10], // [left, top, right, bottom]
  fit: [250, 300] // Scale the image to fit within these dimensions while maintaining aspect ratio
}

// Using base64 data
const imageData = fs.readFileSync(path.join(__dirname, 'images/logo.png'));
const imageBase64 = Buffer.from(imageData).toString('base64');

{
  image: `data:image/png;base64,${imageBase64}`,
  width: 200
}
When working with many images or larger PDFs:
- Resize and compress images before adding them to the PDF.
- Use appropriate image formats.
- Consider caching base64 encoded images if they're used repeatedly.
Advanced PDFMake Features in Node.js
Watermarks
Adding watermarks is a common requirement for many PDF documents. PDFMake makes it easy to add text or image watermarks using the background property:
// Text watermark example using dedicated watermark property
const docDefinition = {
  content: [
    { text: 'Document Title', style: 'header' },
    { text: 'This document contains sensitive information.' }
    // More content...
  ],

  // Dedicated watermark property for all pages
  watermark: {
    text: 'CONFIDENTIAL',
    color: 'red',
    opacity: 0.3,
    fontSize: 80,
    bold: true,
    italics: false
  },

  styles: {
    header: {
      fontSize: 22,
      bold: true,
      margin: [0, 0, 0, 10]
    }
  }
};
For image watermarks:
// Image watermark example
const docDefinition = {
  content: [
    { text: 'Document with Image Watermark', style: 'header' },
    'This document features an image watermark in the background.',
    // More content...
  ],

  // Image watermark
  background: function(currentPage, pageSize) {
    return {
      image: path.join(__dirname, 'images/watermark.png'),
      width: 300,
      opacity: 0.1,
      absolutePosition: {
        x: (pageSize.width - 300) / 2,
        y: (pageSize.height - 300) / 2
      }
    };
  },

  styles: {
    header: {
      fontSize: 22,
      bold: true,
      margin: [0, 0, 0, 10]
    }
  }
};
Headers and Footers
Headers and footers are particularly useful for multi-page documents:
const docDefinition = {
  content: [
    // Multiple pages of content...
  ],
  header: {
      columns: [
          {
              text: 'Company Name',
              alignment: 'left',
              margin: [20, 10, 0, 0]
          },
          {
              image: path.join(__dirname, 'images/logo.png'),
              width: 50,
              alignment: 'right',
              margin: [0, 10, 20, 0]
          }
      ]
  },
  footer: function (currentPage, pageCount) {
      return {
          text: `Page ${currentPage} of ${pageCount}`,
          alignment: 'center',
          margin: [0, 10, 0, 0]
      };
  }
};
Table of Contents
For longer documents, a table of contents can be automatically generated:
const docDefinition = {
  content: [
    { text: 'Document Title', style: 'title' },

    // Table of contents
    {
      toc: {
        title: { text: 'Table of Contents', style: 'tocTitle' },
        // Optional: Create dot leaders between text and page numbers
        textMargin: [0, 0, 0, 0],
        textStyle: { fontSize: 12 },
        numberStyle: { fontSize: 12 }
      }
    },

    // Content with toc items
    { text: 'Chapter 1: Introduction', style: 'header', tocItem: true },
    // Chapter 1 content...
    { text: 'Chapter 2: Methodology', style: 'header', tocItem: true },
    // Chapter 2 content...
    { text: 'Chapter 3: Results', style: 'header', tocItem: true },
    // Chapter 3 content...
    { text: 'Chapter 4: Discussion', style: 'header', tocItem: true },
    // Chapter 4 content...
  ],
  styles: {
    title: { fontSize: 24, bold: true, margin: [0, 0, 0, 20] },
    tocTitle: { fontSize: 20, bold: true, margin: [0, 20, 0, 20] },
    header: { fontSize: 18, bold: true, margin: [0, 20, 0, 10] }
  }
};
You can also manually create a table of contents with page references:
const docDefinition = {
  content: [
    { text: 'Document Title', style: 'title' },
    { text: 'Table of Contents', style: 'tocTitle' },

    {
      table: {
        widths: ['*', 'auto'],
        body: [
          [
            { text: 'Chapter 1: Introduction', linkToDestination: 'chapter1' },
            { pageReference: 'chapter1', alignment: 'right' }
          ],
          [
            { text: 'Chapter 2: Methodology', linkToDestination: 'chapter2' },
            { pageReference: 'chapter2', alignment: 'right' }
          ]
        ]
      },
      layout: 'noBorders'
    },

    { text: 'Chapter 1: Introduction', style: 'header', id: 'chapter1' },
    // Chapter 1 content...
    { text: 'Chapter 2: Methodology', style: 'header', id: 'chapter2' },
    // Chapter 2 content...
  ]
};
Document Security
You can secure PDFs with passwords in Node.js:
const docDefinition = {
  content: ['Secure document content...'],
  // Document security settings
  userPassword: 'user-password', // Password required to open the document
  ownerPassword: 'owner-password', // Password required for full access
  permissions: {
    printing: 'highResolution', // 'lowResolution' or 'highResolution'
    modifying: false,
    copying: false,
    annotating: false,
    fillingForms: true,
    contentAccessibility: true,
    documentAssembly: false
  }
};
PDFMake Invoice Example in Node.js
Here's a complete example of generating an invoice with PDFMake in Node.js. For ready-made invoice layouts, see the PDFBolt template gallery.
Complete Invoice Generation Code Example
const PdfPrinter = require('pdfmake');
const fs = require('fs');
const path = require('path');
// Define fonts
const fonts = {
Roboto: {
normal: path.join(__dirname, 'fonts/Roboto-Regular.ttf'),
bold: path.join(__dirname, 'fonts/Roboto-Medium.ttf'),
italics: path.join(__dirname, 'fonts/Roboto-Italic.ttf'),
bolditalics: path.join(__dirname, 'fonts/Roboto-MediumItalic.ttf')
}
};
// Create the printer
const printer = new PdfPrinter(fonts);
// Define brand colors
const colors = {
primary: '#0c63af',
background: '#f1f1f1',
text: '#1e293b',
border: '#e2e8f0',
lightText: '#718096'
};
// Sample invoice data (normally from a database)
const invoiceData = {
invoice_number: 'INV-001',
date: new Date().toLocaleDateString(),
due_date: new Date(Date.now() + 30 * 24 * 60 * 60 * 1000).toLocaleDateString(),
company: {
name: 'ByteCraft Code',
address: '404 Not Found Lane',
city: 'Silicon Valley, CA 94024',
phone: '(555) 123-4567',
email: 'invoices@byte.example',
website: 'www.byte.example'
},
customer: {
name: 'Pixel Perfect Designs',
address: '42 Answer Avenue',
city: 'Responsive City, NY 10101',
contact_person: 'Clippy McHelpful',
email: 'help@pixel.example'
},
items: [
{description: 'Debugging Services', quantity: 40, unit_price: 120, tax_rate: 0.10},
{description: 'Cloud Hosting', quantity: 1, unit_price: 300, tax_rate: 0.10},
{description: 'Domain Registration', quantity: 2, unit_price: 25, tax_rate: 0.10}
],
notes: 'Thank you for your business!'
};
// Calculate invoice totals
function calculateInvoice(invoice) {
let subtotal = 0;
let totalTax = 0;
invoice.items.forEach(item => {
const amount = item.quantity * item.unit_price;
const tax = amount * item.tax_rate;
item.amount = amount;
item.tax = tax;
subtotal += amount;
totalTax += tax;
});
invoice.subtotal = subtotal;
invoice.total_tax = totalTax;
invoice.total = subtotal + totalTax;
return invoice;
}
// Process invoice data
const invoice = calculateInvoice(invoiceData);
// Format currency
function formatCurrency(value) {
return '$' + value.toFixed(2).replace(/\d(?=(\d{3})+\.)/g, '$&,');
}
// Generate invoice PDF
function generateInvoicePDF() {
// Create PDF definition
const docDefinition = {
pageSize: 'A4',
pageMargins: [40, 50, 40, 50],
content: [
// Header section
{
columns: [
{
width: '*',
stack: [
{
text: 'INVOICE',
style: 'invoiceTitle',
alignment: 'left',
color: colors.primary,
margin: [0, 0, 0, 15]
},
{
table: {
widths: [80, 80],
headerRows: 0,
body: [
[
{text: 'Invoice', style: 'tableHeader'},
{text: invoice.invoice_number, bold: true}
],
[
{text: 'Issue Date', style: 'tableHeader'},
{text: invoice.date}
],
[
{text: 'Due Date', style: 'tableHeader'},
{text: invoice.due_date}
]
]
},
layout: {
hLineWidth: function () {
return 1;
},
vLineWidth: function () {
return 1;
},
hLineColor: function () {
return colors.border;
},
vLineColor: function () {
return colors.border;
}
}
}
]
},
{
image: path.join(__dirname, 'images/logo.png'),
width: 200,
alignment: 'right'
}
],
margin: [0, 0, 0, 30]
},
// Company & Customer Info Block
{
columns: [
{
width: 'auto',
stack: [
{text: 'From:', style: 'subheader'},
{text: invoice.company.name, style: 'boldText'},
{text: invoice.company.address, style: 'normalText'},
{text: invoice.company.city, style: 'normalText'},
{text: 'Phone: ' + invoice.company.phone, style: 'normalText'},
{text: 'Email: ' + invoice.company.email, style: 'normalText'},
{text: 'Web: ' + invoice.company.website, style: 'normalText'}
]
},
{
width: 'auto',
stack: [
{text: 'Bill To:', style: 'subheader'},
{text: invoice.customer.name, style: 'boldText'},
{text: invoice.customer.address, style: 'normalText'},
{text: invoice.customer.city, style: 'normalText'},
{text: 'Contact: ' + invoice.customer.contact_person, style: 'normalText'},
{text: 'Email: ' + invoice.customer.email, style: 'normalText'}
]
}
],
columnGap: 170,
margin: [0, 0, 0, 30]
},
// Item table header
{
canvas: [{type: 'line', x1: 0, y1: 0, x2: 515, y2: 0, lineWidth: 1, lineColor: colors.primary}]
},
{
text: 'Items',
style: 'sectionHeader',
margin: [0, 10, 0, 10]
},
// Line items
{
table: {
headerRows: 1,
widths: ['*', 50, 60, 60, 60],
body: [
// Table header
[
{text: 'Description', style: 'tableHeader', fillColor: colors.background},
{text: 'Quantity', style: 'tableHeader', alignment: 'center', fillColor: colors.background},
{
text: 'Unit Price',
style: 'tableHeader',
alignment: 'right',
fillColor: colors.background
},
{text: 'Tax', style: 'tableHeader', alignment: 'right', fillColor: colors.background},
{text: 'Amount', style: 'tableHeader', alignment: 'right', fillColor: colors.background}
],
// Table body - dynamically add invoice items
...invoice.items.map((item, i) => [
item.description,
{text: item.quantity.toString(), alignment: 'center'},
{text: formatCurrency(item.unit_price), alignment: 'right'},
{text: formatCurrency(item.tax), alignment: 'right'},
{text: formatCurrency(item.amount), alignment: 'right'}
])
]
},
layout: {
hLineWidth: function () {
return 0;
},
vLineWidth: function () {
return 0; // No vertical lines
},
hLineColor: function () {
return colors.border;
},
fillColor: function (rowIndex) {
return (rowIndex % 2 === 0 && rowIndex > 0) ? colors.background : null;
},
paddingLeft: function () {
return 8;
},
paddingRight: function () {
return 8;
},
paddingTop: function () {
return 10;
},
paddingBottom: function () {
return 10;
}
}
},
// Summary section with totals
{
stack: [
{
alignment: 'right',
table: {
widths: ['*', 100],
body: [
[
{text: 'Subtotal:', style: 'tableFooter', alignment: 'right'},
{text: formatCurrency(invoice.subtotal), style: 'tableFooter', alignment: 'right'}
],
[
{text: 'Tax:', style: 'tableFooter', alignment: 'right'},
{text: formatCurrency(invoice.total_tax), style: 'tableFooter', alignment: 'right'}
],
[
{
text: 'Total:',
style: 'tableFooterTotal',
alignment: 'right',
fillColor: colors.primary,
color: 'white'
},
{
text: formatCurrency(invoice.total),
style: 'tableFooterTotal',
alignment: 'right',
fillColor: colors.primary,
color: 'white'
}
]
]
},
layout: {
hLineWidth: function (i) {
return (i === 0 || i === 3) ? 1 : 0;
},
vLineWidth: function () {
return 0;
},
hLineColor: function () {
return colors.border;
},
paddingLeft: function () {
return 10;
},
paddingRight: function () {
return 10;
},
paddingTop: function () {
return 10;
},
paddingBottom: function () {
return 10;
}
},
width: 250,
margin: [0, 20, 0, 0]
}
],
alignment: 'right'
},
// Payment Information section
{
canvas: [{type: 'line', x1: 0, y1: 0, x2: 515, y2: 0, lineWidth: 1, lineColor: colors.primary}],
margin: [0, 30, 0, 10]
},
{text: invoice.notes, color: colors.lightText, alignment: 'center'},
{
columns: [
{
width: '*',
stack: [
{text: 'Payment Information', style: 'subheader'},
{
text: [
'Please make checks payable to: ',
{text: invoice.company.name + '\n', style: 'normalText'},
'Bank Account: ',
{text: '1010 1010 1010 1010', style: 'normalText'}
],
margin: [0, 0, 0, 15]
}
]
}
],
margin: [0, 10, 0, 0]
}
],
styles: {
companyName: {
fontSize: 20,
bold: true
},
companyTagline: {
fontSize: 12,
italics: true
},
invoiceTitle: {
fontSize: 40,
bold: true,
alignment: 'left'
},
sectionHeader: {
fontSize: 14,
bold: true,
color: colors.primary
},
subheader: {
fontSize: 13,
bold: true,
color: colors.primary,
lineHeight: 1.5
},
boldText: {
fontSize: 12,
bold: true,
lineHeight: 1.5
},
normalText: {
fontSize: 10,
color: colors.text,
lineHeight: 1.4
},
tableHeader: {
fontSize: 11,
bold: true,
color: colors.primary
},
tableFooter: {
fontSize: 11,
bold: true
},
tableFooterTotal: {
fontSize: 13,
bold: true
}
},
defaultStyle: {
fontSize: 10,
color: colors.text
},
footer: function (currentPage, pageCount) {
return {
columns: [
{
text: `${invoice.company.name} - ${invoice.company.website}`,
alignment: 'left',
color: colors.lightText,
fontSize: 9,
margin: [40, 0, 0, 0]
},
{
text: `Page ${currentPage} of ${pageCount}`,
alignment: 'right',
color: colors.lightText,
fontSize: 9,
margin: [0, 0, 40, 0]
}
],
margin: [0, 20, 0, 0]
};
}
};
try {
// Generate the PDF
const pdfDoc = printer.createPdfKitDocument(docDefinition);
// Pipe to file
pdfDoc.pipe(fs.createWriteStream('invoice.pdf'));
pdfDoc.end();
console.log('Invoice PDF generated successfully!');
} catch (error) {
console.error('Error generating PDF:', error);
}
}
// Execute the function
generateInvoicePDF();
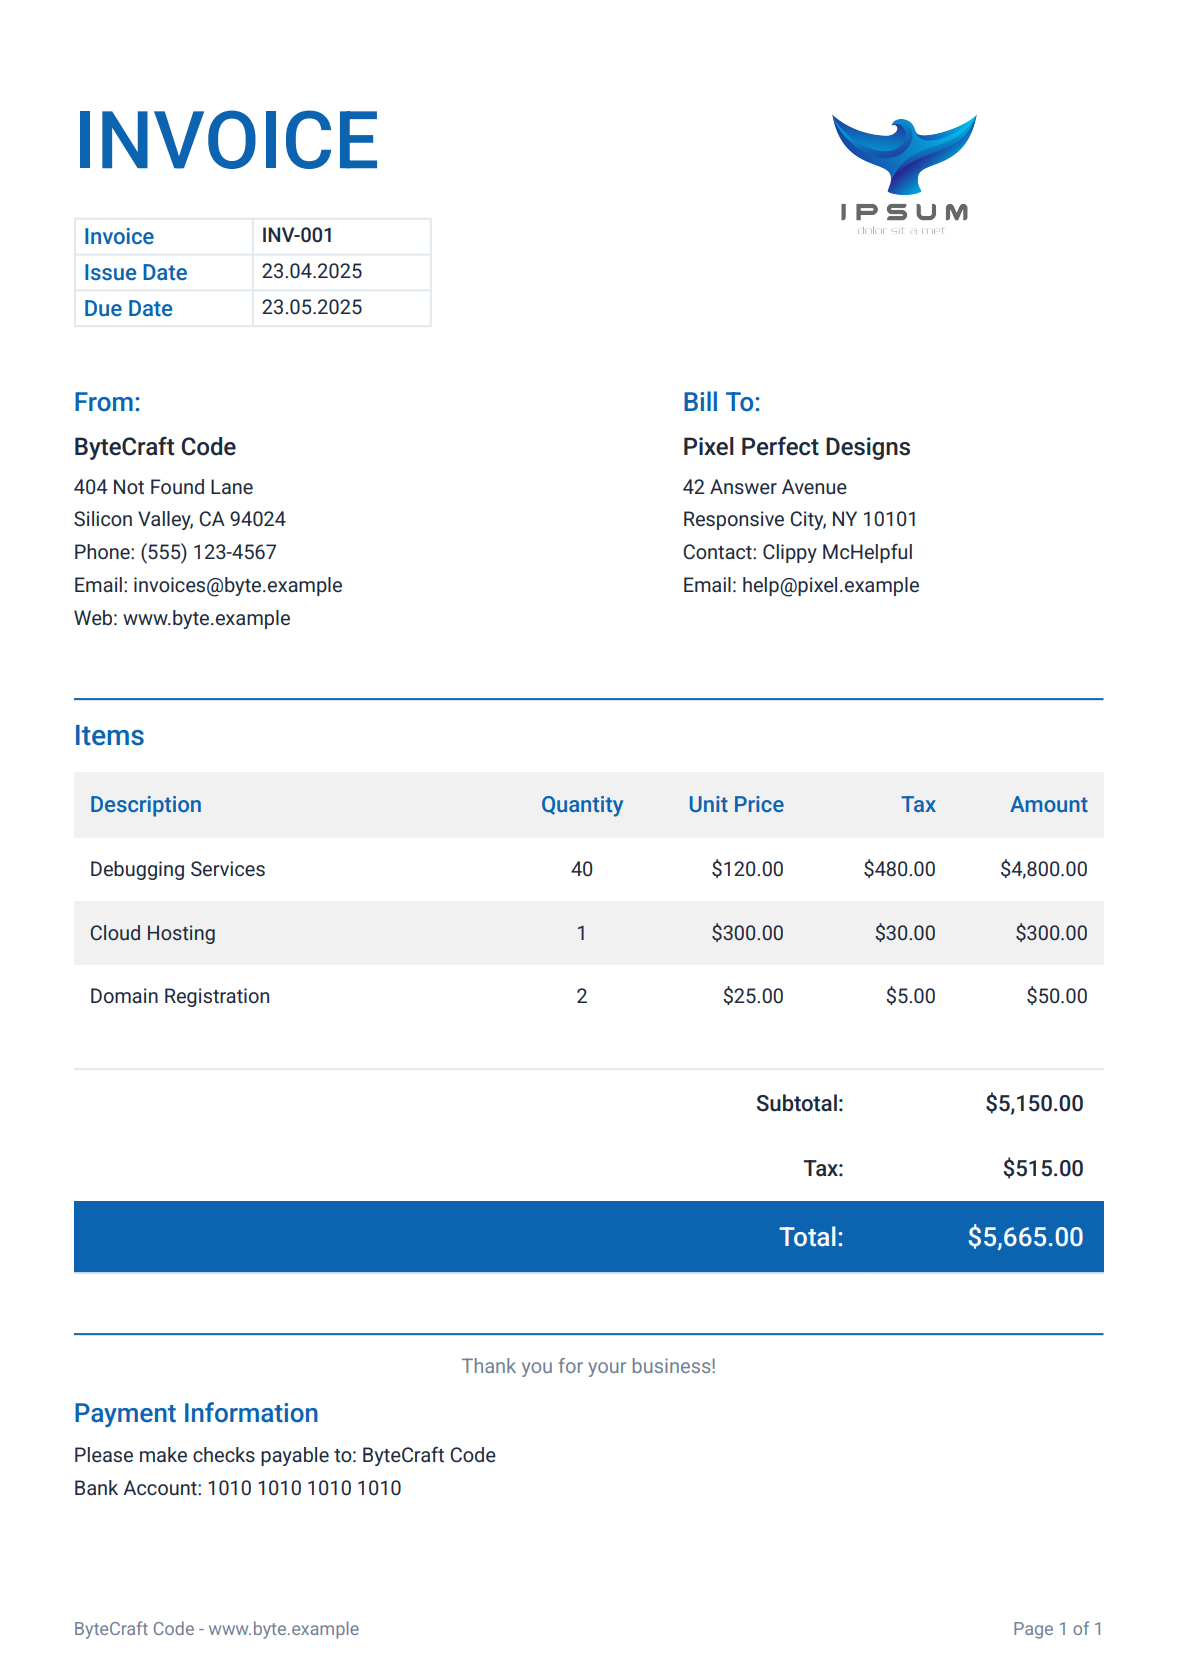
This code generates a professional invoice with the following features:
- Company and customer information blocks.
- Detailed item listing with quantities, prices, and taxes.
- Automatic calculations for subtotals and totals.
- Payment information section.
- Styled footer.
Generated invoice preview:
Best Practices for PDFMake in Node.js
To keep your PDF generation reliable and maintainable, follow these practices:
-
Error handling: Always implement proper error handling to catch and manage exceptions during PDF generation:
try {
  const pdfDoc = printer.createPdfKitDocument(docDefinition);
  pdfDoc.pipe(fs.createWriteStream('output.pdf'));
  pdfDoc.end();
} catch (error) {
  console.error('PDF generation failed:', error);
  // Handle error appropriately
} -
Template separation: Keep your document templates separate from your business logic:
// templates/invoice-template.js
module.exports = function createInvoiceTemplate(data) {
  return {
    content: [
      { text: 'INVOICE', style: 'header' },
      // Template structure using data
    ],
    styles: {
      // Style definitions
    }
  };
};

// pdf-generator.js
const createInvoiceTemplate = require('./templates/invoice-template');

function generateInvoice(invoiceData) {
  const docDefinition = createInvoiceTemplate(invoiceData);
  const pdfDoc = printer.createPdfKitDocument(docDefinition);
  // Generate PDF
} -
Font management: Bundle fonts with your application and use absolute paths for reliability:
const fonts = {
  Roboto: {
    normal: path.resolve(__dirname, '../assets/fonts/Roboto-Regular.ttf'),
    bold: path.resolve(__dirname, '../assets/fonts/Roboto-Medium.ttf'),
    italics: path.resolve(__dirname, '../assets/fonts/Roboto-Italic.ttf'),
    bolditalics: path.resolve(__dirname, '../assets/fonts/Roboto-MediumItalic.ttf')
  }
};
Alternative Approach: Template-Based PDF Generation
While PDFMake gives you full control over document creation, managing the complete structure and styling in code can get complex as requirements grow.
For teams that prefer to separate design from code, template-based services like PDFBolt are an alternative.
How Template-Based PDF Generation Works
Instead of defining document structures programmatically, you can use Handlebars templating with HTML/CSS to:
- Design visually: Create invoice templates using HTML/CSS in a template designer or choose from the template gallery.
- Centralize logic: Handle formatting and styling in one place.
- Publish and integrate: Once your template is ready, publish it and make API calls sending just the template ID and data.
Compare this simple API call with the PDFMake example above
const fs = require('fs');

async function generatePdf() {
    const response = await fetch('https://api.pdfbolt.com/v1/direct', {
        method: 'POST',
        headers: {
            'API-KEY': 'XXXXXXXX-XXXX-XXXX-XXXX-XXXXXXXXXXXX',
            'Content-Type': 'application/json'
        },
        body: JSON.stringify({
            templateId: 'your-template-id',
            templateData: {
                "invoice_number": "INV-001",
                "date": "23.04.2025",
                "due_date": "23.05.2025",
                "company": {
                    "name": "ByteCraft Code",
                    "address": "404 Not Found Lane",
                    "city": "Silicon Valley, CA 94024",
                    "phone": "(555) 123-4567",
                    "email": "invoices@byte.example",
                    "website": "www.byte.example"
                },
                "customer": {
                    "name": "Pixel Perfect Designs",
                    "address": "42 Answer Avenue",
                    "city": "Responsive City, NY 10101",
                    "contact_person": "Clippy McHelpful",
                    "email": "help@pixel.example"
                },
                "items": [
                    {
                        "description": "Debugging Services",
                        "quantity": 40,
                        "unit_price": 120,
                        "tax_rate": 0.10
                    },
                    {
                        "description": "Cloud Hosting",
                        "quantity": 1,
                        "unit_price": 300,
                        "tax_rate": 0.10
                    },
                    {
                        "description": "Domain Registration",
                        "quantity": 2,
                        "unit_price": 25,
                        "tax_rate": 0.10
                    }
                ],
                "notes": "Thank you for your business!"
            }
        })
    });

    if (!response.ok) {
        const errorText = await response.text();
        throw new Error(`HTTP ${response.status} - ${errorText}`);
    }

    const pdfBuffer = await response.arrayBuffer();
    fs.writeFileSync('invoice.pdf', Buffer.from(pdfBuffer));
    console.log('PDF generated successfully');
}

generatePdf().catch(console.error);
This works well when you have multiple document types or high volumes and don't want to manage rendering infrastructure yourself.
PDFMake builds PDFs programmatically but does not render HTML or CSS. If you need to convert web pages or HTML templates to PDF, PDFBolt HTML to PDF API handles rendering with headless Chrome and returns PDFs via a REST call. See the Node.js quick start guide for code examples.
Conclusion
PDFMake handles PDF generation in Node.js through declarative JSON document definitions. You describe the layout, content, and styles as JavaScript objects, and PDFMake renders the PDF without browser dependencies.
The library covers most common use cases – invoices, reports, certificates, multi-page documents with headers and footers. For HTML-based documents or cases where you'd rather design templates visually, PDFBolt's API handles rendering through headless Chrome instead.
Keep your margins well-defined and your fonts properly loaded! 🚀