jsPDF: HTML to PDF in JavaScript (Client-Side Guide)

Generating PDFs directly in the browser gives users immediate, downloadable documents without a server round-trip. This client-side approach reduces server load and works offline. In this guide, we'll show you how to use jsPDF for HTML to PDF conversion in the browser, along with html2canvas for capturing styled content. You'll find working code examples for generating PDFs from text, form data, and rendered HTML elements.
What is jsPDF?

jsPDF is an open-source JavaScript library that lets you generate PDF files directly in the browser. It works entirely on the client-side, so you can create PDFs without any server-side processing. With jsPDF, you can add text, images, shapes, and even HTML content (with the help of libraries like html2canvas) to your PDF documents.
Client-Side PDF Generation
| ✅ Advantages | ❌ Disadvantages |
|---|---|
| No server requests needed | Limited by browser capabilities |
| Works offline | Resource-intensive for complex documents |
| Immediate feedback | Inconsistent rendering across browsers |
| Reduces server load | Security concerns with sensitive data |
| Simple integration | Limited styling capabilities |
| Complete privacy control | Challenging page break handling and multi-page documents |
| Customizable PDF structure | Large file sizes for image-heavy content |
When to Use Client-Side PDF Generation
This approach is ideal when:
- You need simple PDFs generated instantly.
- Offline functionality is required.
- Server resources are limited.
- Documents are small and straightforward.
Practical Use Cases
- Receipts and Invoices: Generate purchase confirmations instantly after checkout.
- Certificates: Create course completion certificates in learning platforms.
- Event Tickets: Produce personalized tickets for immediate use.
- Data Exports: Convert dashboard visualizations to PDF for offline reference.
- Form Summaries: Transform web form submissions into downloadable records.
How to Create a PDF with jsPDF
Setting Up jsPDF in Your Project
- The quickest way to get started is to load jsPDF from a CDN:
<!-- Include jsPDF -->
<script src="https://cdnjs.cloudflare.com/ajax/libs/jspdf/3.0.0/jspdf.umd.min.js"></script>

<!-- Include html2canvas -->
<script src="https://cdnjs.cloudflare.com/ajax/libs/html2canvas/1.4.1/html2canvas.min.js"></script>
- If you're using a bundler (Webpack, Vite, etc.), install via npm instead:
npm install jspdf html2canvas
Generating a Simple PDF
Let's start with a basic example demonstrating how to create a PDF document using jsPDF.
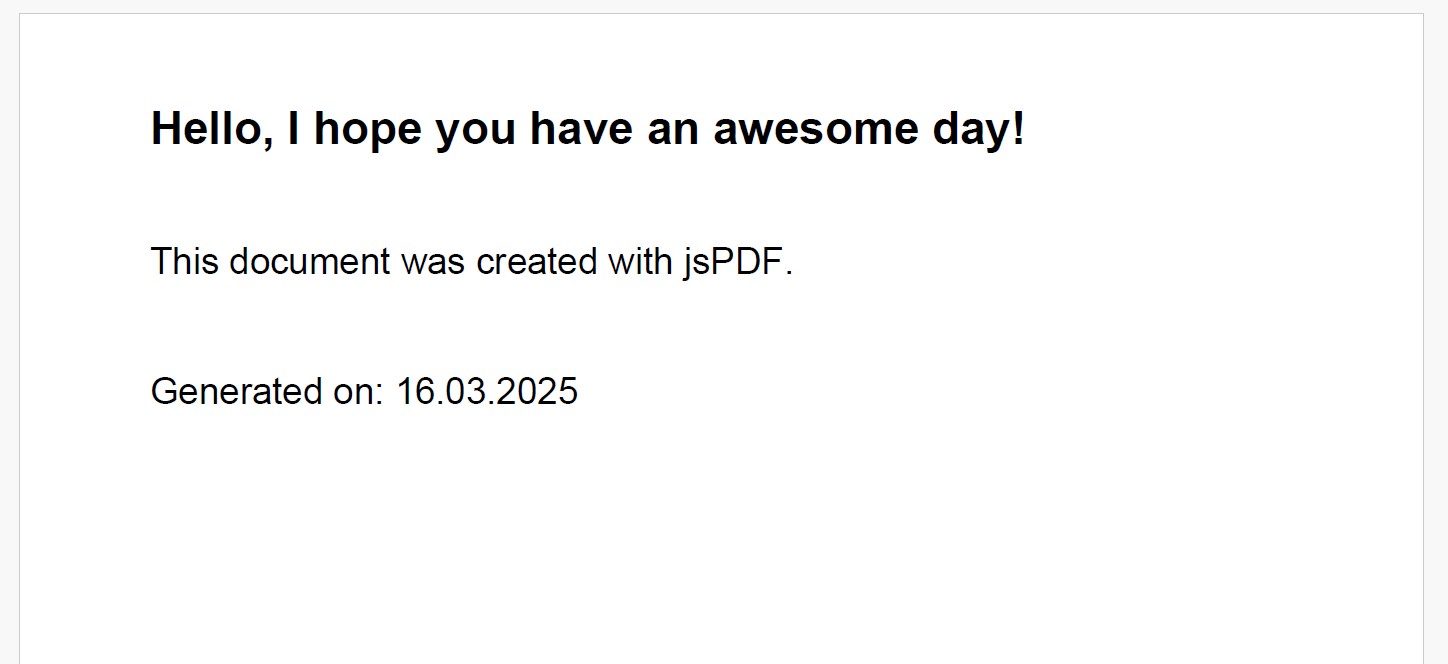
This example creates a simple PDF with text, metadata, and the current date, then triggers a download.
- Code
- Output
    // Create a new jsPDF instance
    const { jsPDF } = window.jspdf;
    const doc = new jsPDF({
        orientation: 'landscape', // 'portrait' or 'landscape'
        format: 'letter',         // Paper size: 'a4', 'letter', etc.
    });

    // Add document metadata
    doc.setProperties({
        title: 'Sample PDF Document',
        author: 'jsPDF',
        subject: 'PDF Generation',
    });

    // Add content
    doc.setFont("helvetica", "bold");
    doc.setFontSize(20);
    doc.text("Hello, I hope you have an awesome day!", 20, 20);

    // Add more content
    doc.setFont("helvetica", "normal");
    doc.setFontSize(16);
    doc.text("This document was created with jsPDF.", 20, 40);

    // Add the current date
    const today = new Date().toLocaleDateString();
    doc.text(`Generated on: ${today}`, 20, 60);

    // Save the PDF
    doc.save("simple-document.pdf");
When executed, this code generates a PDF file named simple-document.pdf.
PDF Generation with jsPDF Only
-
For many applications, generating PDFs using jsPDF directly is sufficient. In the next example, we demonstrate how to generate a PDF based on user input.
-
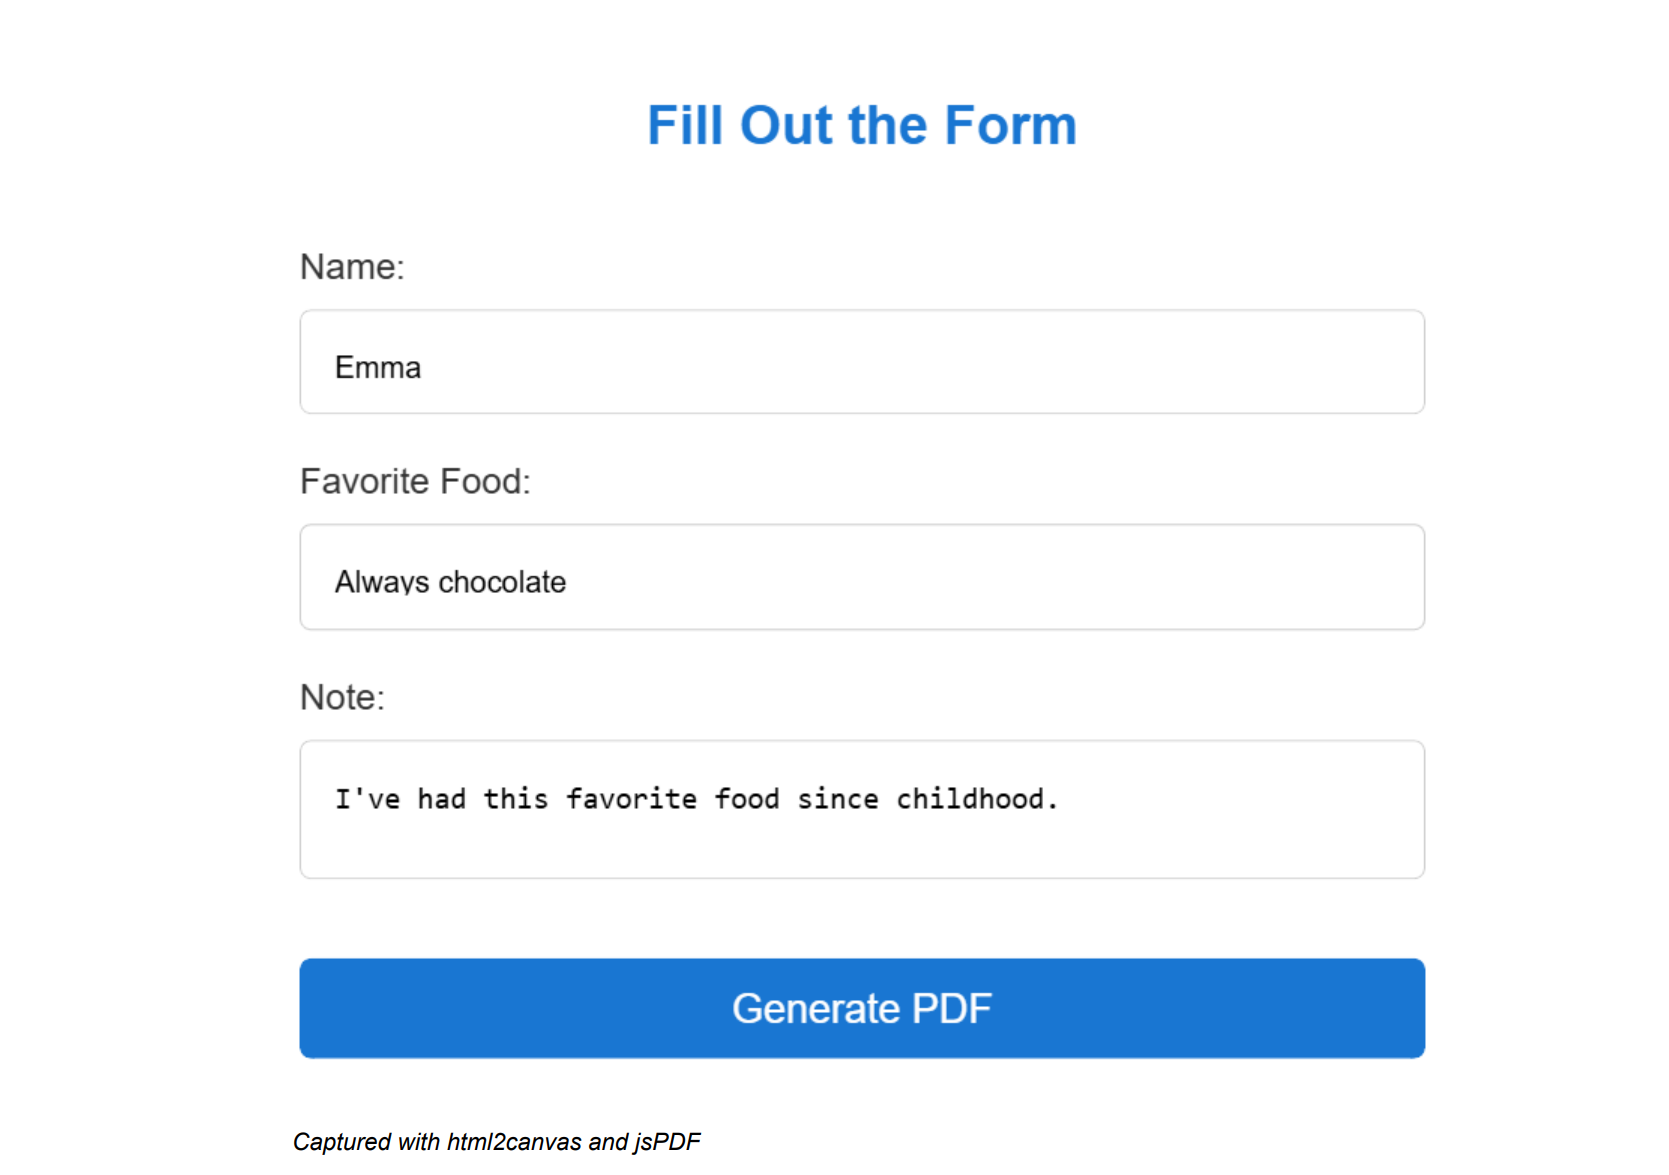
Here, a form is used to collect user data, and upon submission, jsPDF (in combination with the AutoTable plugin) creates a neatly formatted PDF.
Fill out the form below and click Generate PDF to see jsPDF in action:
Fill Out the Form
Below is a complete code demonstrating how to generate a PDF from a form using jsPDF.
View Complete Code
<!DOCTYPE html>
<html lang="en">
<head>
    <meta charset="UTF-8">
    <title>PDF Form</title>
    <style>
        /* Form styling */
        body {
            font-family: Arial, sans-serif;
            padding: 30px;
        }
        .container {
            max-width: 500px;
            background-color: #fff;
            padding: 25px 30px 30px;
            margin: 0 auto;
            box-shadow: 0 0 10px rgba(0,0,0,0.1);
            border-radius: 8px;
        }
        h2 {
            text-align: center;
            color: #1976d2;
        }
        form {
            display: flex;
            flex-direction: column;
        }
        label {
            color: #333;
            font-size: 16px;
            margin-top: 20px;
        }
        input[type="text"],
        textarea,
        select {
            padding: 15px;
            margin-top: 10px;
            border: 1px solid #ccc;
            border-radius: 5px;
        }
        button {
            font-size: 18px;
            margin: 35px 0 10px;
            padding: 12px;
            background-color: #1976d2;
            color: white;
            border: none;
            border-radius: 5px;
            cursor: pointer;
            transition: background-color 0.5s;
        }
        button:hover {
            background-color: #1565c0;
        }
    </style>
    <!-- Include jsPDF and AutoTable plugin from CDN -->
    <script src="https://cdnjs.cloudflare.com/ajax/libs/jspdf/3.0.0/jspdf.umd.min.js"></script>
    <script src="https://cdnjs.cloudflare.com/ajax/libs/jspdf-autotable/3.5.23/jspdf.plugin.autotable.min.js"></script>
</head>
<body>
<!-- Form Container -->
<div class="container">
    <h2>Fill Out the Form</h2>
    <form id="user-form">
        <label for="name">Name:</label>
        <input type="text" id="name" name="name" maxlength="50" required>

            <label for="food">Favorite Food:</label>
            <select id="food" name="food" required>
                <option value="">Select an option</option>
                <option value="Triple cheese pizza">Triple cheese pizza</option>
                <option value="Only healthy food">Only healthy food</option>
                <option value="Always chocolate">Always chocolate</option>
                <option value="On a Diet">I'm on a diet</option>
                <option value="Sushi over everything">Sushi over everything</option>
                <option value="I eat everything">I eat everything</option>
            </select>

            <label for="message">Note:</label>
            <textarea id="message" name="message" maxlength="200" required></textarea>

            <!-- Button to submit form and trigger PDF generation -->
            <button type="submit">Generate PDF</button>
    </form>
</div>

<script>
    // Listen for the form's submit event
    document.getElementById('user-form').addEventListener('submit', function(event) {
        event.preventDefault(); // Prevent default form submission behavior

        // Retrieve user input values from the form
        const name = document.getElementById('name').value;
        const food = document.getElementById('food').value;
        const message = document.getElementById('message').value;

        // Initialize jsPDF with specified configuration
        const { jsPDF } = window.jspdf;
        const doc = new jsPDF({
            orientation: 'portrait',
            unit: 'pt',
            format: 'letter'
        });

        // Add header section
        doc.setFont("times", "bold");
        doc.setFontSize(24);
        doc.text("Form Summary Report", 40, 60);

        // Table section using AutoTable
        const tableColumn = ["Field", "Value"];
        const tableRows = [
            ["Name", name],
            ["Favorite Food", food],
            ["Note", message]
        ];
        doc.autoTable({
            head: [tableColumn],        // Table header row
            body: tableRows,            // Table data rows
            startY: 100,                // Starting Y position
            theme: 'grid',              // Table style theme
            headStyles: {               // Header cell styling
            fillColor: [25, 118, 210],  // Blue background (RGB)
            textColor: 255,             // White text
            halign: 'center',           // Horizontal alignment
            fontSize: 14,               // Font size
            fontStyle: 'bold'           // Font style
        },
        styles: {                       // Body cell styling
            font: "times",              // Font family
            fontSize: 12,               // Font size
            cellPadding: 5,             // Cell padding
            textColor: 0                // Black text
},
    margin: { left: 40, right: 40 } // Table margins
});

        // Get the Y position after the table
        const finalY = doc.lastAutoTable.finalY;

        // Add a footer below the table
        doc.setFont("times", "italic");
        doc.setFontSize(12);
        doc.text("PDF generated with jsPDF!", 40, finalY + 30);

        // Trigger the download of the generated PDF file
        doc.save("form-summary.pdf");
    });
</script>
</body>
</html>
The AutoTable plugin extends jsPDF with table generation capabilities, making it easy to create structured data layouts in your PDFs.
Convert HTML to PDF with html2canvas and jsPDF
- In some cases, you may want to capture the exact look of your web page – including all the applied styles – and convert it into a PDF.
- By combining
html2canvaswithjsPDF, you can capture an HTML element as an image and then embed it into a PDF. - This method is especially useful when you want to maintain the original design of your HTML content in the final PDF.
html2canvas captures HTML elements as images by converting DOM and CSS into canvas content. It preserves the visual appearance of your page, including layouts, fonts, and styling that jsPDF can't natively render.
Trade-off: Because html2canvas renders to a raster image (PNG), text in the resulting PDF will not be selectable or searchable. If you need real text in your PDF, use jsPDF's text and table APIs directly (as shown in the previous example) or a server-side rendering approach.
The original html2canvas package (v1.4.1) is not actively maintained. For new projects, consider using html2canvas-pro, an actively maintained fork with bug fixes and improved CSS support.
Below is a complete code example that demonstrates how to generate a PDF from a form using html2canvas and jsPDF. In this example, the form is captured as an image when submitted, and that image is inserted into a PDF document.
View Complete Code
<!DOCTYPE html>
<html lang="en">
<head>
    <meta charset="UTF-8">
    <title>PDF Form with html2canvas</title>
    <style>
        /* Form styling */
        body {
            font-family: Arial, sans-serif;
            padding: 30px;
        }
        .container {
            max-width: 500px;
            background-color: #fff;
            padding: 25px 30px 30px;
            margin: 0 auto;
            box-shadow: 0 0 10px rgba(0,0,0,0.1);
            border-radius: 8px;
        }
        h2 {
            text-align: center;
            color: #1976d2;
        }
        form {
            display: flex;
            flex-direction: column;
        }
        label {
            color: #333;
            font-size: 16px;
            margin-top: 20px;
        }
        input[type="text"],
        textarea,
        select {
            padding: 15px;
            margin-top: 10px;
            border: 1px solid #ccc;
            border-radius: 5px;
        }
        button {
            font-size: 18px;
            margin: 35px 0 10px;
            padding: 12px;
            background-color: #1976d2;
            color: white;
            border: none;
            border-radius: 5px;
            cursor: pointer;
            transition: background-color 0.5s;
        }
        button:hover {
            background-color: #1565c0;
        }
    </style>
    <!-- Include html2canvas and jsPDF from CDN -->
    <script src="https://cdnjs.cloudflare.com/ajax/libs/html2canvas/1.4.1/html2canvas.min.js"></script>
    <script src="https://cdnjs.cloudflare.com/ajax/libs/jspdf/3.0.0/jspdf.umd.min.js"></script>
</head>
<body>
<!-- The container holds the form that we want to capture -->
<div id="form-container" class="container">
    <h2>Fill Out the Form</h2>
    <form id="user-form">
        <label for="name">Name:</label>
        <input type="text" id="name" name="name" maxlength="50" required>

        <label for="food">Favorite Food:</label>
        <select id="food" name="food" required>
            <option value="">Select an option</option>
            <option value="Triple cheese pizza">Triple cheese pizza</option>
            <option value="Only healthy food">Only healthy food</option>
            <option value="Always chocolate">Always chocolate</option>
            <option value="On a Diet">I'm on a diet</option>
            <option value="Sushi over everything">Sushi over everything</option>
            <option value="I eat everything">I eat everything</option>
        </select>

        <label for="message">Note:</label>
        <textarea id="message" name="message" maxlength="200" required></textarea>

        <!-- Button to submit the form and generate the PDF -->
        <button type="submit">Generate PDF</button>
    </form>
</div>

<script>
    // Listen for the form's submit event
    document.getElementById('user-form').addEventListener('submit', function(event) {
        event.preventDefault(); // Prevent the default form submission

        // Capture the #form-container using html2canvas
        html2canvas(document.getElementById('form-container')).then(function(canvas) {
        const imgData = canvas.toDataURL('image/png');
        const { jsPDF } = window.jspdf;

        // Create a new PDF document
        const pdf = new jsPDF({
            orientation: 'landscape',
            unit: 'pt',
            format: 'a4'
        });

        // Add the captured image to the PDF
        pdf.addImage(imgData, 'PNG', 120, 0);

        // Add footer text
        pdf.setFont('helvetica', 'italic');
        pdf.setFontSize(12);
        pdf.text('Captured with html2canvas and jsPDF', 150, 580);

        // Save the PDF
        pdf.save('form-html2canvas.pdf');
    });
 });
</script>
</body>
</html>
The code above will generate a PDF that looks like this:
When Client-Side PDF Generation Isn't Enough
jsPDF and html2canvas work well for simple documents, but some requirements go beyond what browsers can handle. If you need any of the following, a server-side approach will be a better fit:
- Professional typography with custom fonts.
- Complex layouts that must render the same across all browsers.
- Multi-page documents with headers and footers.
- Print-ready PDF output (PDF/X-1a, PDF/X-4).
- Template-based document generation at scale.
- High-volume batch processing.
For production workloads, APIs like PDFBolt handle the heavy lifting – rendering happens on the server with a headless Chromium engine, so you get consistent output without managing browser instances yourself. If you want to compare your options, check out our overview of Node.js PDF generation libraries or our Puppeteer PDF guide.
- PDF Generation API Docs – Complete reference and examples.
- Template-Based PDF Generation – Templates overview, benefits, and use cases.
- Quick Start Guide – Multi-language integration.
Frequently Asked Questions About jsPDF
What is jsPDF?
jsPDF is an open-source JavaScript library that generates PDF files directly in the browser, entirely on the client-side with no server-side processing. You can add text, images, shapes, and tables (via the AutoTable plugin) to build documents, then trigger a download with doc.save(). It is a good fit for simple, instant documents like receipts, certificates, and form summaries.
Can jsPDF convert HTML to PDF directly?
Not directly. jsPDF builds PDFs programmatically through its text, image, and table APIs, and it cannot natively render arbitrary HTML and CSS. To capture the exact look of a styled page you pair it with html2canvas, which rasterizes an HTML element to a PNG that jsPDF then embeds. The trade-off is that this image-based output is not selectable or searchable, so for real text use jsPDF's native text and table APIs instead.
How do you load jsPDF from a CDN and use window.jspdf (UMD)?
Add the UMD build via a script tag, then destructure the jsPDF constructor off the global window.jspdf object:
<script src="https://cdnjs.cloudflare.com/ajax/libs/jspdf/3.0.0/jspdf.umd.min.js"></script>
<script>
  const { jsPDF } = window.jspdf;
  const doc = new jsPDF();
</script>
If you use a bundler like Webpack or Vite, install it with npm install jspdf and import it instead.
Is jsPDF good for multi-page documents?
It works for small, straightforward documents, but page break handling and multi-page layouts are a known weak spot of client-side generation. Long, image-heavy, or complex documents are resource-intensive in the browser and render inconsistently across browsers. As a rule of thumb, do not try to generate something like a 50-page report client-side.
How do you render HTML to PDF on the server instead of in the browser?
When you need consistent cross-browser rendering, custom fonts, headers and footers, or multi-page documents at scale, move generation to the server. A hosted HTML to PDF API renders your HTML with a headless Chromium engine, so the output matches your design without managing browser instances yourself. You send HTML or a URL and receive a finished PDF in return.
Conclusion
jsPDF and html2canvas cover the basics well – forms, receipts, simple reports. For text-heavy documents, stick with jsPDF's native text and table APIs – you'll get smaller files and selectable text. The code examples above should get you started.
For anything more complex (consistent cross-browser rendering, custom fonts, multi-page documents), a server-side API like PDFBolt will save you a lot of headaches.
Just don't try generating a 50-page report in the browser. Your users will not thank you. 😬